Illustration Friday: Skull

It’s been a while since I’ve done an “Illustration Friday” topic, but seeing as I got myself a Wacom tablet this week, I decided to attempt this one while I learned how to use it.

https://twitter.com/caseykayb/statuses/502663209254264832

It’s taking a bit of work to get the hang of drawing sideways and seeing it drawn straight on the screen. I even tried turning the canvas on the computer at first. But the tablet doesn’t know it’s been turned. It’s actually getting easier the more I work with it.

Drawn in ArtRage software using a Wacom Intuos Pen and Touch Tablet.

Quick DIY: Neon Chalk Sign

I bought some chalk markers the other day, these chalk markers to be exact, and immediately I knew I had to make some decoration with them. After livening up my “To Do” board with the nice, fluorescent colors, I knew I wanted to make something a little more “permanent.

The perfect idea came to me as we were shopping in Target. I got a frame and decided to make my own “neon” sign. It’s so easy and took me only about half an hour including sketching out how I wanted it to look.

What You’ll Need:

  • Chalk Markers
  • Ruler
  • Scissors
  • Black (or Dark) Paper
  • Pencil
  • Eraser
  • Marker (with similar sized tip as chalk marker)
  • Library/Credit/Store Loyalty Card

Not Pictured:

  • Picture Frame with Glass plate (I used this one from Target)
  • Scrap White Paper
  • Tracing Paper
  • Clear Contact Paper

How to do it:

  1. Start by deciding on your phrase and sketch out how you want the words to look. I started with regular printer paper and writing the words as large as I wanted to see which style of typeface would work for the effect I wanted. I used the title of my favorite Foo Fighters album because it’s also just a phrase I find stuck in my head regularly.
  2. Once you have your styles chosen, remove the backing and front plate from your frame and trace inside the actual opening of the frame so you have the boundaries of what will be visible inside the frame. This way you know exactly how much space you have to work with.
  3. Lay out your phrase the way you want it to look inside the frame. This may take a few tries, so I would suggest to trace yourself a few spaces to use.
  4. Once you have it looking the way you want it, trace it onto the tracing paper using your regular marker. Make sure you also trace at least the corners of the bounding box to match up with the glass.
  5. Now you want to clean the glass with a damp paper towel and dry it really well with a dry one. You want to be sure there are no finger prints and you want to be sure there aren’t water streaks that will cause the colors to run.
  6. Flip your tracing paper over so the words are backwards and lay the glass over it so the words are where they should be.
  7. Now trace everything with your chalk markers. You want to make sure everything looks the way you want it to. Make sure it has a few minutes to fully dry, as well.
  8. Take a piece of clear contact paper that has at least a few inches on two sides to hold onto and place it flat over the glass. Take whatever type of plastic card you have on hand and smooth out any bubbles that may have occurred.
  9. Cut your black or dark paper to fit inside the frame and reassemble the frame with your glass, the paper, and the backing. You are finished!

Now you have a nice, bright sign to decorate your space. If you ever decide you want it to say something different, just remove the contact paper, wash the marker off, and start over.

Mine is now adding some much needed color and decoration to the shelf I added to my wall as a charging shelf. It was very bare during the day when I had nothing charging.

Happy Easter Eve!

Which snuck up on me like a ninja. Seriously, until last week I wasn’t aware that Easter is tomorrow. Maybe I do miss out on things by not watching broadcast TV. Except I was watching TV last week and didn’t see anything about it…

But, I’m rambling. What I’m really here to say is, “Happy Easter-is-tomorrow, fellow procrastinators!” That’s right, I spent all afternoon making Easter surprises for the boys because that is how on top of it I am. And because I know there have to be at least a few people out there in the same boat, here is a quick tutorial of what I did today. Well, quick if you actually have the right supplies on hand.

Do yourself a favor and start by clicking that image to download the template for all of the pieces of the egg and chick. That will save you a lot of time. If you want to also cut out the name of the recipient to glue on, the font used is American Typewriter set in bold at 72pt.

Now, gather some paper in the colors you want to use. You know, pick one color for the eggshell, one for the stripes, one for the dots (which I used as eyes because putting the double stick tape on each one was going to be really annoying to use them as shell decoration), one for the letters, yellow for the chick’s body, and orange for the beak. You will also want glue of some sort, but double stick tape will work in a pinch. And don’t forget the scissors or X-acto knife.

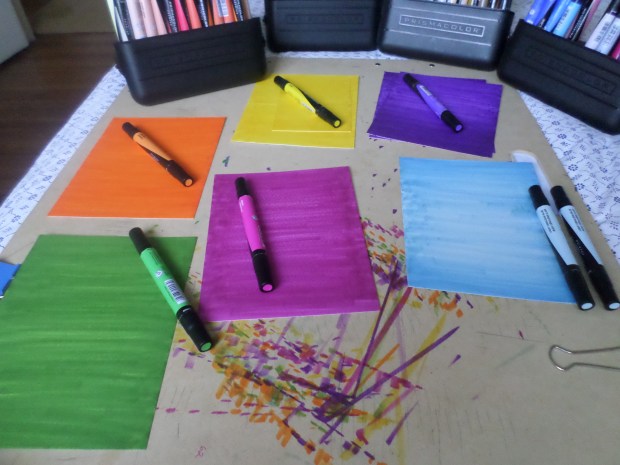
As you can see, I didn’t have colored paper on hand. I made some instead using some Strathmore Mixed Media Paper in the 6×8 size and my Prismacolor markers. It took a few coats, but I came up with these:

Now it’s time to cut out all of the pieces using whichever color you choose. Note: The beak pieces, wings, and chick body need to be cut out for each side but were not included twice on the printout. Sorry. Also, the print out makes one set of pieces, but the pictures show it doubled since I was making two at a time.

Working from the inside out, first glue the beak pieces together to make two double-sided triangles. Set them like a slightly open beak inside the body pieces and glue the body pieces together. Next, set the chick in the top opening of the egg and glue the egg together. Decorate the egg with the zigzags and dots, then attach the wing to the body overlapping the egg. Finally, put the letters on the front, add an eye to the chick, and you are finished!

See how easy that is? The most time-consuming part (assuming you are using pre-colored paper) is cutting out all the pieces. If you choose to make one, leave me a link in the comments. I’d love to see them.

Happy Easter, Everyone!