Bubbles, Bubbles Everywhere

Well, only a little bit while I was filling the bottles, and when testing out the solution.

What do you do when a kid is really deep into a phase of character obsession? You give in and make everything about his birthday presents reflect that, or course. Well, you do if you are me and generally terrible at coming up with gift ideas.

Confession: I like to make a good chunk of the gifts I give just because I walk into a store to buy something for a person and can spend hours wandering in circles without coming up with anything. At least with making something I can tailor something generic into something I think they will enjoy.

So, what do you give a four-year-old who has a ton of toys and yet mostly just plays with whatever his baby brother is interested in because that’s how four-year-olds are? Bubbles. Also, because that is how I like to keep him occupied outside while said baby brother naps in the mornings.

I made a home-made bubble solution using 1 part baby wash (so it won’t sting so much if bubbles get blown into baby brother’s eyes, ahem), 1 part light corn syrup (so the bubbles are more elastic), and 2 parts water. I also made them slightly more special than store-bought bubbles by creating four smaller bottles of scented bubbles. I added a teaspoon of extract to each of the 3 oz containers to make chocolate, peanut butter, orange, and vanilla bubbles. Then I poured the rest of the bubble solution into the corn syrup and baby wash bottles with the labels removed and set about making my own labels for each bottle.

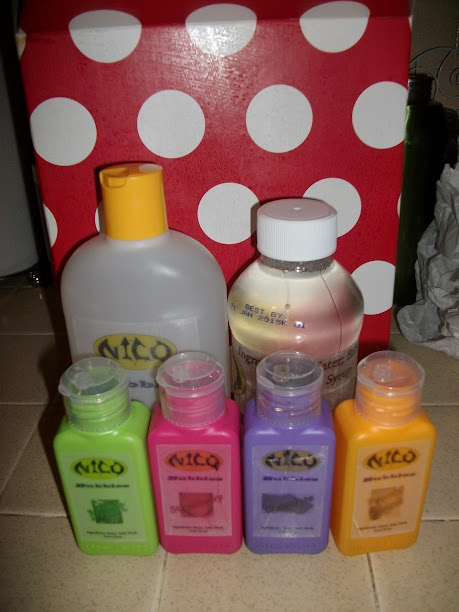
I created a Batman-esque symbol using his name and then labeled the bubbles with their ingredients, just because that is always a good thing to put on a label. I love Photoshop and Illustrator. Just saying. Anyway, I printed them on clear labels (and forgot how horribly the ink smudges on those labels so my mother and I had to layer packing tape over the top before we stuck them to the bottles) cut them out and stuck them on.

Did I mention I did all of this the day before his birthday party? Yeah, I’m really bad at waiting until the last minute on things like that.

But not as bad as the other part of his gift. Which I will tell you about on Wednesday since I started out writing this as all one post and it got very long and very wordy very quickly. But don’t worry, that one has a story that is just as entertaining as this was, or perhaps even more so.

Do you have a go-to gift idea? What do you get for small children when their birthdays/other gift-giving holidays come around?

Send It Off

I haven’t posted a project that didn’t involve yarn recently, and I want to correct that injustice. Because I do occasionally do something other than sit around an knit. Occasionally. Although I do have a giant string of projects waiting in my Ravelry queue.

Anyway, back in May (I should really catch up on these things already) I had a few occasions that required cards. And most times I like to make cards, unless I find a really funny one at Target. First was a friend’s birthday:

I started with my watercolor cards I bought to make Christmas cards last year and created the purple to pink wash. Then I drew the decorations with markers. I also glued rhinestones on at the last minute, but I didn’t take a picture of it after that (of course). Gold rhinestone in the centers of the flowers, if you are curious.

Then, there was Mother’s day. One grandmother got a lovely plant and the other got a card with a picture of a plant, a week late. Yeah, I’m on top of these holidays this year.

Again, I took my watercolor card and started with washes of color. Over several days, letting the cards dry in between coats, of course, I made a layer of yellow, then slowly added light, transparent washes of the orange and purple to get the desired sunset. Then I took my trusty India ink on a dry brush and created the palm trees with just a few, sweeping brush strokes.

On the inside of this one I used lettering stamps to write “Happy Mother’s Day!” in rainbow colors. Then I signed it and sent it out. Again, a week late. In my defense…well, there really is no excuse except I guess I was just a little busy with a billion different projects getting ready to go on my trip to France. Even though those things were a month apart. Yeah.

I cannot recommend these watercolor cards highly enough if you like to make cards of any kind. They have other versions for different media as well, but I find watercolors to be the best way to make these cards.

My question to you today is: What do you do about greeting cards? Do you make them, buy them, or send e-cards? Do you go for funny or more sappy poignant cards?

Printing Cards

It’s been a while since I’ve posted something non-knitting. To be honest, it’s been a while since I’ve done anything non-knitting. I’ve been in a self-imposed knitting rut trying to make all those blasted squares in such a short time. Really have to stop doing that to myself.

Anyway, I seem to keep adding more media to my…”artistic repertoire”, if you will. This one is pretty cool, though. I’ve taken up lino carving. It’s a way of making your own stamps.

For this first one, I got a kit with a lino block, carving tool, and brayer (the thing you use to put paint on the stamp). The carving tool has interchangeable ends to carve different widths and depths of lines. The block that came with the kit is a hard material attached to a wooden block.

The process goes a but like this:

  1. Draw out the design on paper. This is especially essential for words, because the print is going to be reversed from what you see on the face of the stamp.
  2. Trace the drawing onto tracing paper in pencil. It has to be pencil so it will transfer to the block. I filled in all the areas I wanted to cut away to make it easier on myself. That way you just remove all the pencil marks and don’t have to worry about hollowing out the wrong part.
  3. Place the tracing paper onto the block and rub really hard with your pencil to transfer the design.
  4. Carve out the parts where you want “white space”, being really careful. Remember, any place there isn’t rubber, there won’t be ink. Even if that is just a slight scratch.

I decided to make something I could use for a while. What kind of a stamp could one use most often? A “thank you” stamp, of course. Somehow, I don’t have a picture of the actual stamp, but these are the cards I made from it:

Thank You Cards

It took a little experimentation to get the right concentration of ink so the image showed up without being blobby. I think I got it down pretty well. I really like the “distressed”(?) look these have.