Custom Cross Stitch Process

Today, I’m going to walk you through my process for custom cross stitch orders with the example project I just made for my mother.

A portrait of a woman with black and purple hair, glasses, a teal shirt, and a white necklace standing in front of a tree smiling.

Every portrait starts with a photo. Obviously, the higher the resolution of the photo, the more detail will be in the final piece because it is a lot like pixel art. I also crop the photo to fit best in the 5×7 frame to ensure the most detail as well.

A pixelated version of the previous portrait, cropped close to the woman’s face.

I then generate a pattern for 22-count aida fabric with up to 240 colors using the MacStitch program, and provide a preview PNG for approval. Once the preview is approved, I can start stitching.

An in-progress picture of the portrait being stitched from the middle out with many strands of embroidery thread hanging around the edges.

For a 5×7 picture, there are 16,940 stitches which takes anywhere between 90-100 hours of stitching depending on how many blocks of color there are. More frequent color changes will result in a longer stitching time. This piece in particular took 98 hours and 55 minutes, because I timed it.

The finished portrait wrapped around a mounting board and propped up against a candlestick on a wooden table.

Once the piece is finished, it gets gently handwashed, set on a drying rack to dry for a few days, ironed, and then mounted to a self-adhesive mounting board to be framed. I prefer to deliver the pieces just on the mounting board because it allows you to choose your own frame to match your decor.

And that’s it. The whole process takes about a month, though I have it listed as two just to be on the cautious side with shipping times and such. If you would like to order one for yourself, they are available in my commissions menu on Ko-fi. If you are looking for a different size than the 5×7, message me there and we can discuss what you are looking for.


Follow me on Instagram and Ko-fi.

Finished Object – Roblox Pillow

(Note: I swear I published this back in September of last year, but it was still in my drafts folder and the link lead nowhere when I pasted it into a private window, so here it is. Originally written to be posted September 12, 2022)

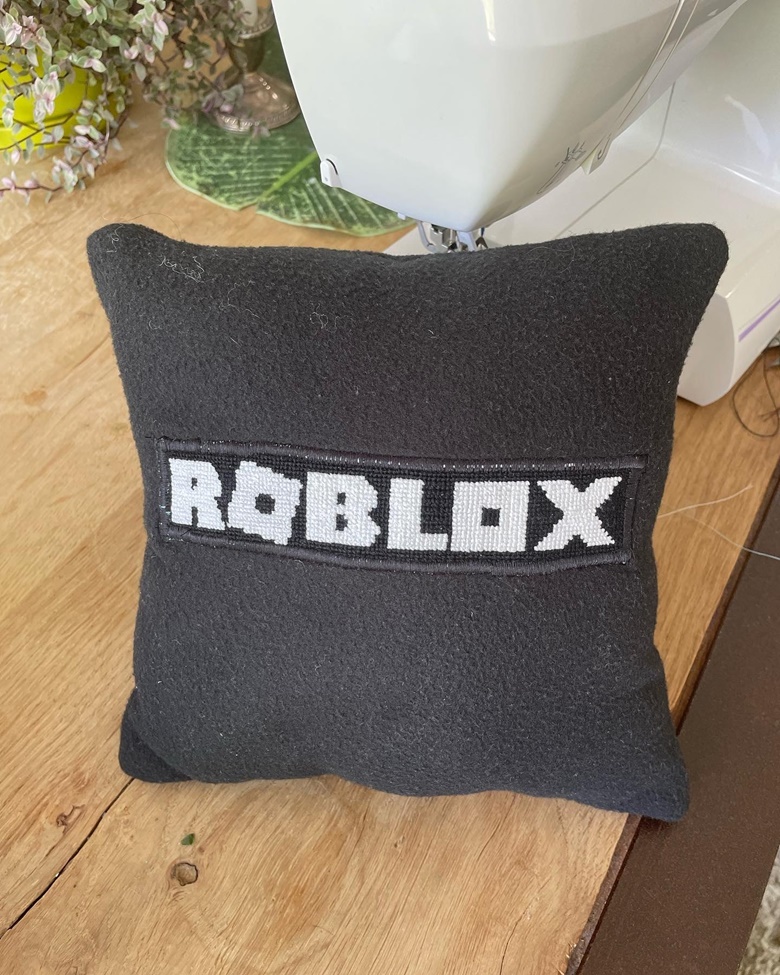
The littlest turned 10 a couple of weeks ago and had a simple request – a Roblox pillow with the logo on a black background.

Friends, they do not make Roblox pillows at all, so it was time to make one. At first, I was going to cross-stitch the name on one side and the logo on the other. Never mind the fact that I was starting this less than a week before his birthday.

I showed him one of my cross-stitched pillows as an example to make sure it was what he wanted, and he said it was, or it could be a soft pillow like his favored pillow he won at a carnival game at a theme park this summer. That would be much easier than cross-stitching two whole sides of a pillow anyway.

My original thought was to punch needle the logo side so it would be soft, but I didn’t actually have the appropriate fabric, and what I had that I thought would work did not. In the end, I ran up to JoAnns, bought an 8th yard each of black and white fleece, and appliqued it together using my sewing machine on the zigzag setting on the shortest stitch length.

I was also originally going to cross-stitch the entire back and line it with the fleece, but I messed up the colors (don’t color match after dark, friends) and had to start over when I was almost done with the lettering, so I abandoned that idea as well and just did enough of a border to be able to also applique that piece to the black felt.

Sewed everything together inside out, turned it right way around, stuffed it with pillow fluff and the scrap threads, and managed to give it to him the day after his birthday. Bonus points, it turned out the exact perfect size for the little dog’s head, so he lays on it every time he hops on the bed and it is adorable.


Cross Stitch Materials List

You really don’t require many supplies to begin cross stitching. If you already embroider, you will probably only need to pick up the correct fabric from a local craft store, or even Amazon. Here is my list of needs and wants when it comes to starting cross stitch:

  • Aida fabric in the count called for on the pattern. The count tells you how many stitches will be in each inch in your finished project. If you want to make a project a different size, you can use a cross stitch calculator like this one from Yarn Tree to decide what count of fabric to use or how big your final piece will be.
  • Embroidery thread or floss. The easiest to find is DMC cotton thread, which comes in 6-strand skeins. You can find many different ways to store your floss, from keeping it in the skein to wrapping it on plastic bobbins or even making your own bobbins from scrap cardboard you may have laying around.
  • Embroidery needle. These needles will typically have a slightly larger eye and sharp point, but you can also find ones with duller points since you will be going through the holes in the weave of the fabric.
  • Scissors. Really, you can use any scissors you have around the house for cutting your threads, but you may find it easier to cut, especially when using fewer than six strands, with small embroidery scissors. Overall, your best bet is with sharp scissors, because dull ones will take more effort and leave behind more fraying, making it difficult to thread your needle.
  • Marking pen. I tend to use a water-erasable fabric pen, but other people use Frixion pens which are heat-erasable.
  • Optional: Embroidery hoop or Q-snap frame. It makes it much easier to get consistent stitches when your fabric is held taught in a hoop or frame, but these aren’t actually necessary. It is entirely possible, especially when working with a stiff fabric like Aida, to hold the fabric in your hand and stitch it. Sometimes, if you are working with a smaller piece of fabric, it can even be easier to skip the hoop for stitching and use it solely for displaying the finished piece.
  • Optional: Project bag. Whether a repurposed grocery bag, a special fabric pouch, or even a dedicated basket, it can be helpful to have a specific place to keep all your cross stitch supplies related to your project. If you plan on working on more than one project at a time, it is especially helpful to keep each project’s supplies together in one place.
  • Optional: Needle Minder. A needle minder is a set of two strong magnets, often with a cute picture on the top piece, that you sandwich your fabric in so you have a place to set the needle when you aren’t working on your piece. I tend to stick my needles to the magnets on the edge of my laptop or iPad case while getting more thread and stick the needle in the fabric when I/m not working on it at all, but many people find it helpful to have a needle minder.
  • Optional: Hoop or frame stand. These are helpful when doing long projects, but can also be helpful on quick projects. They come in floor and chair models, and hold your hoop to either free up both hands for stitching or just to not cause pain in the hand you would normally use for holding the hoop. Again, not a necessary item, but definitely can be helpful in the long run.